现在可以在内核状态控制板载LED灯。
之前使用 riscv64-elf-x86_64 交叉编译测试文件,它无法使用 open函数进行正常调用。
正确应该使用 riscv64-linux-musl-x86_64 。
使用 riscv64-linux-musl-x86_64 需要将工具链的动态库 拷贝到 开发板
scp [email protected]:/root/duo/host-tools/gcc/riscv64-linux-musl-x86_64/sysroot/usr/lib64xthead/lp64d/libc.so /lib/ld-musl-riscv64xthead.so.1
如果你的目录结构跟我的不一样需要更改命令!
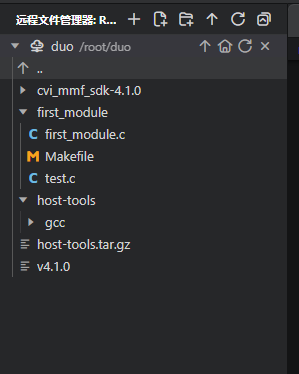
如题主所说 在milk-v duo的SDK目录外,新建一个文件夹,例如命名为led_module,进入led_module文件夹;
创建一个led_module.c文件,文件内容如下:
#include <linux/kernel.h>
#include <linux/module.h>
#include <linux/fs.h> //file_operations声明
#include <linux/device.h> //class devise声明
#include <linux/types.h> //设备号 dev_t 类型声明
#include <linux/uaccess.h> //copy_from_user 的头文件
#include <linux/gpio.h>
#include <linux/cdev.h>
#define gpio_num 440
static int major;
static dev_t led_dev;
static struct class *led_class;
static struct device *led_device;
static struct cdev led_cdev;
static int led_io_open(struct inode *inode, struct file *filp)
{
printk(“led_open\n”);
gpio_request(gpio_num, NULL);
return 0;
}
static ssize_t led_io_write(struct file *filp, const char __user *buf, size_t count, loff_t *fpos)
{
int Cmd = 0; //上层是整数1
printk(“io_write\n”);
copy_from_user(&Cmd,buf,count);
if(Cmd == 1){
printk(“set 1\n”);
gpio_direction_output(gpio_num, 1);
}else if(Cmd == 0){
printk(“set 0\n”);
gpio_direction_output(gpio_num, 0);
}else{
printk(“cmd error\n”);
}
return count;
}
static ssize_t led_io_read(struct file *filp, char __user *buf, size_t count, loff_t *fpos)
{
printk(“ledread!!”);
unsigned long err;
char *ptr = (char )__get_free_page(GFP_KERNEL);
if (!ptr) {
return -ENOMEM;
}
/ Do IO read operation with ptr here */
if (copy_to_user(buf, ptr, count)) {
free_page((unsigned long)ptr);
return -EFAULT;
}
free_page((unsigned long)ptr);
return count;
}
static const struct file_operations led_io_fops = {
.owner = THIS_MODULE,
.open = led_io_open,
.read = led_io_read,
.write = led_io_write,
};
static int __init led_module_init(void)
{
printk(“Hello, module is installed !\n”);
int ret;
// 分配设备号
if (alloc_chrdev_region(&led_dev, 0, 1, “led_device”) < 0) {
printk(KERN_ERR “Failed to allocate device number\n”);
return -1;
}
// 创建设备类
led_class = class_create(THIS_MODULE, “led_class”);
if (IS_ERR(led_class)) {
printk(KERN_ERR “Failed to create class\n”);
unregister_chrdev_region(led_dev, 1);
return -1;
}
// 创建设备节点
led_device = device_create(led_class, NULL, led_dev, NULL, “led”);
if (IS_ERR(led_device)) {
printk(KERN_ERR “Failed to create device\n”);
class_destroy(led_class);
unregister_chrdev_region(led_dev, 1);
return -1;
}
// 注册字符设备驱动
cdev_init(&led_cdev, &led_io_fops);
ret = cdev_add(&led_cdev, led_dev, 1);
if (ret < 0) {
printk(KERN_ERR “Failed to add device to kernel\n”);
device_destroy(led_class, led_dev);
class_destroy(led_class);
unregister_chrdev_region(led_dev, 1);
return -1;
}
return 0;
}
static void __exit led_module_exit(void)
{
gpio_free(gpio_num);
printk(“Good-bye, module was removed!\n”);
// 删除字符设备驱动并从内核中删除设备节点
cdev_del(&led_cdev);
device_destroy(led_class, led_dev);
// 销毁设备类
class_destroy(led_class);
// 释放设备号资源
unregister_chrdev_region(led_dev, 1);
}
module_init(led_module_init);
module_exit(led_module_exit);
MODULE_LICENSE(“GPL”);
然后再创建一个Makefile文件
SDK_DIR = /root/duo/cvi_mmf_sdk
KERN_DIR = $(SDK_DIR)/linux_5.10/build/cv1800b_sophpi_duo_sd
all:
make -C $(KERN_DIR) M=$(PWD) modules
clean:
make -C $(KERN_DIR) M=$(PWD) modules clean
rm -rf modules.order
obj-m += led_module.o
注意 tab 和 更改sdk目录。
make得到 .ko文件,
拷贝到板子上。
scp [email protected]:/root/duo/first_module/led_module.ko /root/
在开发板上insmod
insmod first_module.ko
dmesg 就可以看到 “Hello, module is installed !”
编写测试文件,
test.c
#include <sys/types.h>
#include <sys/stat.h>
#include <fcntl.h>
#include <stdio.h>
int main(int argc, char const *argv)
{
int data;
int fd;
fd = open(“/dev/led”,O_RDWR);
if(fd < 0 ){
printf(“open failed\n”);
}else{
printf(“open success\n”);
}
while(1){
printf(“please input 0/1:(0:low–1:high)\n”);
scanf(“%d”,&data);
if(data == 1 | data == 0){
printf(“data=%d\n”,data);
}else{
printf(“error input\n”);
return 1;
}
write(fd,&data,4);
}
return 0;
}
使用 host-tools/gcc/riscv64-linux-musl-x86_64/bin/riscv64-unknown-linux-musl-gcc 交叉编译 test.c
传到开发板 运行即可控制开发板上的led灯。
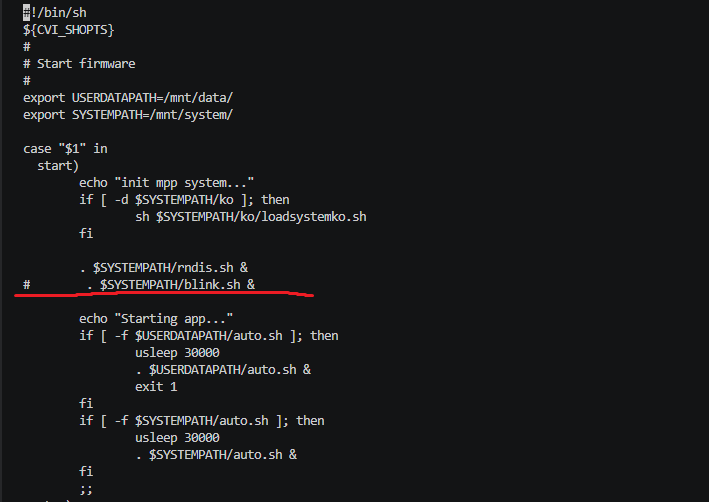
前提是禁用开发板上电时 的自启动脚本
vi /etc/init.d/S99user
注释这行,重启后 led就不再闪烁