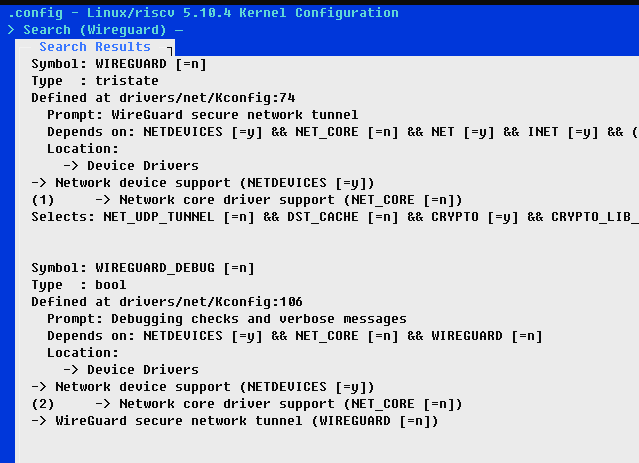
0. Duo256M 编译内核 增加 WireGuard 网络支持

# 找到duo256m linux kernel配置文件存放的地方
build/boards/cv181x/cv1812cp_milkv_duo256m_sd/linux/cvitek_cv1812cp_milkv_duo256m_sd_defconfig

# 拷贝到linux kernel目录下,注意改成.config
~ cp build/boards/cv181x/cv1812cp_milkv_duo256m_sd/linux/cvitek_cv1812cp_milkv_duo256m_sd_defconfig linux_5.10/.config

# 切换到linux目录进行menuconfig
~ cd linux_5.10/
~ make ARCH=riscv menuconfig
请参考文章 Debian & Arch Linux On Milkv-duo 256M,然后按上图搜索定位 WireGuard 配置位置
编译一个支持 CONFIG_CGROUPS=y CONFIG_SIGNALFD=y CONFIG_TIMERFD=y WIREGUARD=y,最大内存的内核。
或者按下面第一步直接下载内核
1. 下载 duo256_WireGuard.zip 挂载 tf卡启动分区替换升级
fdisk -l

Device         Boot  Start      End  Sectors  Size Id Type
/dev/mmcblk0p1 *         1   262144   262144  128M  c W95 FAT32 (LBA)
/dev/mmcblk0p2      262145 61445215 61183071 29.2G 83 Linux

mkdir -p boot
mount /dev/mmcblk0p1 boot

7z  x  ~/duo256_WireGuard.zip
2. 重启 Duo 256M Debian 系统,然后安装 WireGuard 管理程序
apt update -y
apt install wireguard-tools wireguard -y
apt install resolvconf -y
注意不要忘记安装 resolvconf 如果没有安装这个会出错如下
 wg-quick up wg0
[#] ip link add wg0 type wireguard
[#] wg setconf wg0 /dev/fd/63
Warning: AllowedIP has nonzero host part: 10.0.0.1/24
[#] ip -4 address add 10.0.0.198/24 dev wg0
[#] ip -6 address add fd08:620c:4df0:65eb::198/64 dev wg0
RTNETLINK answers: Operation not supported
[#] ip link delete dev wg0
3. 配置 WireGuard ,建立公钥和密钥
mkdir -p /etc/wireguard
cd /etc/wireguard
wg genkey | tee privatekey | wg pubkey > publickey
生成类似下面的配置 wg0.conf
[Interface]
PrivateKey = IFuCoG2Uv.....YOK8VM=
Address = 10.0.0.9/24
DNS = 8.8.8.8

[Peer]
PublicKey = AMy4V0Bqv.....BHwNAYeiY=
Endpoint = 1.2.3.4:9999
AllowedIPs = 10.0.0.1/24
PersistentKeepalive = 25
4. 启动和停止 WireGuard 查看链接情况 wg
root@milkv-duo:/etc/wireguard# wg-quick down wg0
[#] ip link delete dev wg0
[#] resolvconf -d tun.wg0 -f

root@milkv-duo:/etc/wireguard# wg-quick up wg0
[#] ip link add wg0 type wireguard
[#] wg setconf wg0 /dev/fd/63
Warning: AllowedIP has nonzero host part: 10.0.0.1/24
[#] ip -4 address add 10.0.0.9/24 dev wg0
[#] ip link set mtu 1420 up dev wg0
[#] resolvconf -a tun.wg0 -m 0 -x

root@milkv-duo:/etc/wireguard# wg
interface: wg0
  public key: w78r4c+ODRWT/AceKMyyASJjOLK42Gw=
  private key: (hidden)
  listening port: 42996

peer: AMy4V0BqvC39Wyc6gf7rjiWZVBHwNAYeiY=
  endpoint: 1.2.3.4:9999
  allowed ips: 10.0.0.0/24
  latest handshake: 46 seconds ago
  transfer: 92 B received, 212 B sent
  persistent keepalive: every 25 seconds
配置好 WireGuard 内网穿透,就可以从公网上服务器登陆和反代 MilkV Duo 256M 上跑的网页了
测试连接和ssh登陆
ping 10.0.0.9

PING 10.0.0.9 (10.0.0.9) 56(84) bytes of data.
64 bytes from 10.0.0.9: icmp_seq=1 ttl=64 time=13.2 ms

ssh [email protected]
公网服务器 https代理 MilkV Duo 256M 内网IP设置
# 把http的域名请求转成https
server {
        listen 80;
        server_name  vip.lyvba.com ;
        return 301 https://vip.lyvba.com$request_uri;
}

# https 安全证书配置和代理设置
server {
        listen 443 ssl ;
        server_name  vip.lyvba.com;

        ssl_certificate     cert/vip.lyvba.com.crt;
        ssl_certificate_key cert/vip.lyvba.com.key;

        ssl_session_timeout 5m;
        ssl_protocols TLSv1 TLSv1.1 TLSv1.2;

        ssl_ciphers ECDHE-RSA-AES128-GCM-SHA256:HIGH:!aNULL:!MD5:!RC4:!DHE;
        ssl_prefer_server_ciphers on;

        index index.html index.php;

        location / {
                proxy_pass http://10.0.0.9/;
                proxy_set_header Host $host;
                proxy_set_header X-Real-IP $remote_addr;
                proxy_set_header X-Forwarded-For $proxy_add_x_forwarded_for;
                proxy_set_header X-Forwarded-Proto $scheme;
                proxy_set_header X-Forwarded-Protocol $scheme;
                proxy_set_header X-Forwarded-Host $http_host;

                proxy_buffering off;
        }
}

